Tuesday, June 30, 2009

Nancy J. Ondra: A Gentle Plea for Pathways

Whether you’re obsessed with gardening or have just a few flower beds in your yard, your goal is probably the same: to make your home a prettier place to live. So when you plan a new bed or border, you’re thinking about colors and fragrance, heights and forms, and flowers and foliage: the more, the better. Design experts spur us on with advice to make our borders longer and wider — skip those narrow strips and plan plantings that are 8, 12, 15, or more feet deep, the better to fit in a wider range of plants. Thinking big is all part of the fun and excitement of starting a new garden. But when it comes time to actually take care of it, you may realize why some folks like to quote the old saying, “Praise large gardens; plant small ones.”

Now, I’m the last person to discourage anyone from making the garden of his or her dreams. I’ve started plenty of beds and borders of my own in the last twenty-plus years, and over time they seem to be getting larger and larger (like the pair of curved beds shown above and the naturalistic border below). I’m not into making more and more work for myself, though. Part of my secret for making lower-maintenance gardens is depending on fuss-free plants, such as plenty of ornamental grasses. Another labor-saving secret is planning ahead for easy access, by considering the size of the area carefully before I start and, if necessary, incorporating pathways right into the plantings.

As a general rule of thumb, the maximum width for a border that you can access from only one side is around 3 feet. And for a bed or border that you can access from both sides, a width of 6 feet is usually about right. You’ll probably still have to step into the area at planting time, but after that you should be able to stand or kneel on the edge and reach even the plants at the back or in the middle without stretching too much. If you go much wider than that, you’ll often have to step into the garden itself, and over time that can cause soil compaction and interfere with healthy root growth. It’s also tougher to get mulch spread evenly by flinging it in just from the edge, and weeding becomes a big hassle. Trying to balance on one foot while leaning in to cut back lanky stems or trim off dead flowers can lead to strained muscles or (even more serious, from a gardener’s perspective) damaged plants if you fall over or drop your tools.

A much easier approach is to create some easy way to get to all the plants while still staying relatively upright yourself. A mulched strip even 1 foot wide between a narrow border and the wall or fence behind it (as shown in my foundation border in early June last year, below left) can be a big help; 18 to 24 inches wide is even better. Before you know it, the plants at the back will have grown tall enough that the access path will barely be visible (as evidenced in a view of the same border barely four weeks later, below right), but you’ll still be able to walk there without stepping on the loose soil or on the crowns of your plants.

If you’re creating beds or borders wider than 6 feet or so, think seriously about making a path 18 to 36 inches wide through the planting area as part of the design. (Remember to add an access path along the back of the border, as well.) If you keep the path on the narrower side and simply mulch it, you’ll hardly see it, but you’ll know it’s there when you need it. A wider path encourages strolling within the planting, allowing you and your visitors to get up close and personal with the plants for enjoyment as well as maintenance.

Below is a shot of the same planting pictured at the top of this entry taken from a different angle, showing that the 3-foot-wide path isn’t even visible from outside the garden. (I should mention that I don’t recommend grass paths throughout plantings, because they then add maintenance time in the form of mowing and edging. Trust me on this, and don’t make the same mistake I did! Mulch or paving will be much less work in the long run.)


All this planning advice is well and good if you’re starting a garden from scratch, but what if you already have a planting that’s too big to maintain easily? Well, as you divide the perennials, think about replanting them in slightly different positions or maybe leaving a few of them out altogether, to make some access room for yourself. And if a plant dies, consider adding a sturdy stepping stone there instead of replanting. Then remind yourself that next time you’re going to leave enough room for both your plants and you!

— Nancy J. Ondra

Nancy J. Ondra is a freelance garden writer and editor who owned and operated a small rare-plant nursery for six years. She is the author or coauthor of a dozen gardening books, including Foliage: Astonishing Color and Texture Beyond Flowers, which won the 2008 Book Award from the American Horticultural Society); The Perennial Gardener’s Design Primer (winner of a 2006 Silver Award from the Garden Writers Association); and Grasses: Versatile Partners for Uncommon Garden Design. She currently gardens on her own four acres in Bucks County, Pennsylvania; works as a horticulturist at Linden Hill Gardens in Ottsville, Pennsylvania; and contributes to two garden blogs: hayefieldhouse.com and www.gardeninggonewild.com.

It's Officially Summer!


The sun has been hiding for a few weeks here in New England – but today we see signs of hope! There's a blue sky up there, and it makes me want to take advantage of summer immediately (ie – jump in a lake and then come home and throw a great dinner party outside!). These photos by Tec Petaja,  combined with our classic Picnic, are the perfect inspiration (for the dinner party – not the lake). Here’s a super yummy recipe for Cold Carrot Soup, ideal for those hot, steamy nights! 

Cold Carrot Soup

Whether perfumed with ginger or dill, this soup is excellent hot or cold.

3 cups peeled and sliced carrots
1/2 cup water
1 medium onion, chopped
1 tablespoon butter
1 tablespoon vegetable oil
3 cups chicken stock (homemade, if possible)
1 teaspoon peeled and grated fresh ginger root, or 1 tablespoon finely minced fresh dill
3/4 teaspoon salt
1/4 teaspoon white pepper
1 cup plain yogurt
dill sprigs for garnish

1. Cook the carrots in the water in a microwave oven for 5 minutes, or until tender.

2. Sauté the onion in the butter and oil in a small skillet over medium heat.

3. Pour half of the carrots and onions into a blender with 1 cup of the chicken stock and purée until smooth. Transfer the purée to a large bowl or plastic container with a cover. Pour the remaining carrot mixture, 1 more cup of the chicken stock, the ginger root, salt and pepper into the blender; purée until smooth. Combine the batches and mix well.

4. Stir the remaining chicken stock and yogurt into the soup and chill for 2 hours in a covered plastic container. At the picnic, serve the soup in small bowls and garnish each with a sprig of dill.

Serves 8
 
— Jayme Hummer, Public
ist 

Monday, June 29, 2009

Adventures in Chicken Sitting

For the past five days I have been taking care of Alethea, Mars, and Xavier’s chickens while they have been on vacation. If you are thinking of getting your own backyard flock and have never had birds of any kind, I recommend that you “borrow” some chickens for a while and experience what it’s like to care for them.

They are adorable! They’re very friendly toward people, and as Alethea has described in her posts, they have distinct personalities. Every time I come near their box, and especially when they are hungry, they cheep excitedly and try to fly up to meet me. Now that their feathers have grown in, they are flapping their wings and trying to fly more and more.

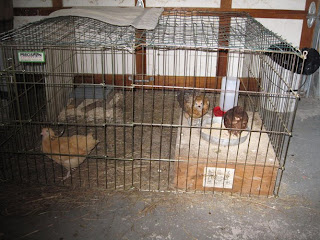
At first I was nervous that I’d do something wrong and something would happen to the chickens. I didn’t dare let them out of their box, but after a few days it really needed to be cleaned out. Chickens do smell! By Sunday I was confident enough in handling them that I was easily able to catch them and transfer them to a 4-foot-square dog pen in the garage that we have been using to confine our elderly cat at night. I put a generous layer of hay down on the concrete floor and used an upside-down wine box as a platform for their food and water containers. I decided to give them their chicken feed in an old cake pan instead of in the chick feeder, as they were scratching so vigorously while eating that they kept clogging up the small holes of the feeder with bedding material.

They are really enjoying the new surroundings and are delighting in scratching the hay looking for tidbits and watching our comings and goings. When flies approach the cage, they follow the insects intently and try to fly up into the air to catch them. Fly control: another reason to keep chickens!

Mars, Xavier, and Alethea will be taking the chickens home tomorrow. I’m sure they’re going to be surprised at how much they’ve grown in the past week. They have outgrown their cardboard box, and it’s time for them to move to their new chicken house. I’m sure Alethea will blog about that next time. It was lots of fun taking care of the chickens, and I’ll miss them.

— Ilona Sherratt

Our Dyeing Days

An inside look at a photo shoot for our upcoming book, Hand-Dyeing Yarn and Fleece

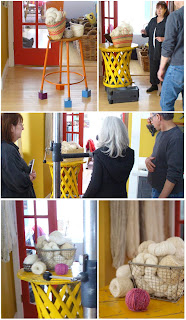
Photographer John Polak (in rear); Lisa Newman, our stylist (right);
and I, the art director,
puzzling out a shot that perhaps
is not quite there yet
(photo taken sneakily by Gail Callahan
when we were too engrossed to notice)
.

One by one we arrived at photo stylist Lisa Newman’s house, our arms full . . . well, except for mine. As art director I brought only some rough layouts, a shot list, and a healthy curiosity. The author, Gail Callahan, arrived with baskets of yarn and fleece, various type of dyes, and several bags with tools and other gizmos. The photographer, John Polak, had the usual array of camera equipment, a ladder, scrim material, and plenty of duct tape.

But it was Gwen Steege, the editor, who saved the day, as she arrived with a box of blue vinyl gloves she had scored earlier that morning from her dentist. Dyers need to protect their hands while working, and the color and fit were all-important, as those gloves would turn up in almost every how-to photograph that we took.

John photographed our author (not Gwen’s dentist)
measuring dyes with a gloved hand.


Lisa’s friend Gloria Pacosa brought over a couple of cheerful oilcloth aprons for the author and editor to wear during the dyeing how-to sequences; these ultimately set the mood for this book project. I found myself happily immersed in art while directing the shoot, as I watched the happy dyers, Gwen and Gail, collaborate.

Lisa took this behind-the-scenes picture of Gail (left) and
Gwen
conferring on ways to demonstrate dyeing a cone.

Lisa, our stylist, was patiently transforming her lovely home into a busy dyeing/photography studio. Every surface was covered with yarns soaking and drying, undyed skeins and fleece, bottles of dye and vinegar, papers, props, and knitting thingamajigs. To get us started Lisa provided us with coffee strong enough to curdle fresh cream and an assortment of wonderful breads, scones, cookies, and brownies.

Coffee and snacks helped us focus as projects took over every chair and table.
The fruit and extreme brownie closeup are my iPhone pics.
Lisa gets credit for the coffee photo above.

Inspired by color everywhere, John Polak couldn’t resist taking photo
vignettes even when they weren’t on the list (left). I tried to follow suit
with my handy iPhone camera (center and right).


My iPhone caught Gwen looking on as the photo on the right
was being taken.
Steam adds a challenge for the photographer
as the yarn sinks into the pan.


Aprons and gloves were donned. Tables were covered with plastic and newspaper. Scrims were taped to the windows. And nearby but out of sight were a sponge and cleaner . . . just in case.

Photo shoots are a funny thing. If you do a good job, no one will ever know the effort expended to set up a single shot. Ask Gwen; she’s got a good story about setting up our photo shoot for the parking meter–dyeing method. I’ll let her unravel that one. . . .

Gail took some snaps as we did a little finagling with this setup
for a chapter opener.
Bottom right is our final photo taken by John Polak.

Mary Velgos, Storey Art Director

Friday, June 26, 2009

What Are You Going to Do With All Those Strawberries?

It's strawberry season! There's nothing quite as delicious as fresh, ripe strawberries. I've been buying them at the farmers market the past few weeks — they are so sweet and juicy I don't ever want to eat imported greenhouse strawberries from the supermarket again. But, as you may know, strawberry season is short, and they won't last forever. This weekend, pick your own or buy fresh from a farmstand or farmers market, and buy a lot!


What are you going to do with all those strawberries? Eat some fresh, of course, maybe make some strawberry pancakes or strawberry pie or strawberry shortcake, freeze some, and preserve some as jam or jelly. Below are a few recipes from Storey's Country Bulletin Jams, Jellies & More.

Spiced Strawberry Jam
Easy to prepare, this is spicier than most strawberry jams.

5 cups crushed strawberries (about 2 quarts cleaned and stemmed)
½ teaspoon ground allspice
½ teaspoon ground cinnamon
¼ teaspoon ground cloves
1 box (1¾ ounces) powdered fruit pectin
½ teaspoon butter or margarine
7 cups sugar

1. in an 8-quart saucepan, combine the strawberries and the spices. Add the pectin and butter. Bring to a full boil on high heat, stirring constantly.
2. Stir in the sugar and mix well. Return to a full boil and boil for 1 minute exactly, stirring constantly.
3. Remove the saucepan from the heat and, using a metal spoon, skim off any foam.
4. Ladle into sterile half-pint jars (*see below), leaving ¼ inch of headspace. Cap and seal. Process for 5 minutes in a boiling-water-bath canner. Adjust for altitude, if necessary.

Yield: 5 half pints


Baked Low-Sugar Strawberry Jam
Raspberries and blackberries can also be made into jam using this method.

8 cups strawberries, washed, drained, patted dry, and halved
1 cup sugar
3 tablespoons lemon juice

1. Preheat the oven to 375°F.
2. Combine all the ingredients in a 2-quart casserole dish and bake, uncovered, for 15 minutes. Reduce the heat to 325°F. Bake for another 1–1½ hours, stirring often.
3. To test for setting, let a spoonful of the jam cool then test using one of the methods described on pages 7–8. If the jam is too runny, return it to the oven and bake again at 325°F for up to 45 minutes longer, then test again for thickening.
4. Pack the finished jam in clean half-pint freezer cartons (*see below). Refrigerate for up to 2 weeks or freeze for up to 6 months.


Yield: 3 half pints


Strawberry-Rhubarb Jelly
This jelly, adapted from a USDA recipe, is a southern tradition.

1½ pounds red rhubarb stalks, washed and cut into 1-inch pieces
1½ quarts strawberries, washed, hulled, and crushed
6 cups sugar
6 ounces liquid fruit pectin

1. Purée the rhubarb in a blender or food processor.
2. Prepare a jelly bag by pouring boiling water through it. Squeeze out the excess moisture. Line the bag with a double layer of cheesecloth.
3. Place both fruits in the bag, let drain into a bowl, and squeeze gently to remove the excess juice.
4. Measure 3½ cups of strained juice into a 3-quart saucepan. Add the sugar, mix thoroughly, and boil until the sugar dissolves.
5. Remove the pan from the heat and stir in the pectin. Return to the heat and bring to a full boil. Boil for exactly 1 minute.
6. Remove from the heat and, with a metal spoon, skim off any foam. Ladle the jelly into sterile half-pint jars (*see below), leaving ¼ inch of headspace. Cap and seal. Process in a boiling-water-bath canner for 5 minutes. Adjust for altitude, if necessary.

Yield: 7 half pints


*Preparing Jars and Lids
The jars you use for jams, jellies, and other preserves must be canning jars free of cracks and chips. Jars made for commercial fruit spreads should never be reused, as they may not withstand long exposure to high temperatures in the boiling-water bath.
Most recipes call for half-pint jars with a two-piece lid consisting of a new metal vacuum lid and a new or reused metal screw ring that holds the lid in place during processing. You can remove the screw ring 24 hours after canning. If left on the jar, the screw lid may rust, in which case you will not be able to use it again. If the ring is stuck, however, don’t force it or you may break the seal; simply leave it in place. Do not tighten the ring after processing — this, too, may break the seal.
It is not necessary to sterilize jars used for food that is processed in a boiling-water bath for 10 minutes or longer. Simply wash the empty jars in soapy water or the dishwasher, then rinse thoroughly to remove all traces of soap. Keep lids and rings in gently boiling water until you are ready to use them.
For boiling-water-bath processing times of less than 10 minutes, you must sterilize the prewashed jars. Fill them with hot tap water, then submerge them in a canner filled with hot (not boiling) water, making sure the water rises 1 inch above the jar tops. At sea level, boil the jars for 10 minutes; at higher elevations, boil for an additional minute for every 1,000 feet above sea level. Use a jar lifter to remove one sterilized jar at a time, then fill immediately with the prepared fruit spread.


I plan on giving the baked jam a try. Let me know what you made or what you did to preserve your strawberries.

Kristy L. MacWilliams, Storey Marketing Manager

Honoring the Solstice: Lavender Circles and Three-Second Symphonies


Long days . . . sunrise and sunset remarkably far to the north . . . the sun high overhead: this must be the solstice, although New England has been submerged for days in heavy clouds and sudden torrential rainstorms. But even if I can't see the sun, I find I need to celebrate the solstice as a key moment in our earthly cycle and our planet's journey around the sun.

My bedroom windows look to the east, so long ago I carved a mini-Stonehenge on the windowsill, tracing the lines of the midsummer sunrise, the equinox sunrise, and the midwinter sunrise. Together the solstice lines make an almost-90-degree angle, with the equinox line exactly in the middle, pointing due east.

Another way I’ve found to honor the solstice (involving less vandalism) is by harvesting lavender, my favorite of all gardening activities. Tonight after dinner I began. My 20-year-old daughter Tess joined me with a cup of tea, talking softly while birds heralded the evening. It was peaceful and fragrant and as pleasant as could be.


Lavender harvest begins.


You must harvest lavender when the tall gray-green stalks are loaded with stacks of intense purple buds but before the buds open their petals and release their scent into the air. This seems to happen reliably around the solstice, even despite our moody weather spell. Like many flowers, lavender keeps its buds tightly closed during rainy periods, so those buds just kept getting fatter, packing more and more fragrance inside.

My lavender grows in a couple of terraced beds along some wide stone steps, and the seams in the stones are now white with flowering thyme. Native to the Mediterranean coasts, both thyme and lavender thrive in the heat absorbed and radiated by the stone. Nearby a beautiful, fragrant rose has just burst into bloom, and this year I planted sugar snap peas below a trellis behind the rose. So tonight we had lavender, roses, thyme, and blossoming peas (with the very first pods showing), all within arm’s reach.


Looking down from my deck I can see a couple of newly harvested
lavender plants on the left, thyme growing among the stone steps,
the white blossoms of peas climbing up a trellis, and a bit of the
new red leaves of a climbing rose to the right (buds not visible).


I like to cut the lavender with as long a stalk as possible and then spread it on a sheet on a bed to air dry (lucky room where that bed is). Later you can pull off the buds and stuff them into little muslin sacks to make dream pillows. But my favorite thing to do while the stems are flexible is to make lavender circlets or miniature wreaths, as a symbol of the circle of the year. You gather the stalks together in a staggered procession and bend them into a circle, wrapping it tightly with thread or fine dental floss. Once you’ve made the circle connect, you can insert more stems. A fairly quick, not too fussy or rigid version of this is best — suitable as a spontaneous gift for people you love or a crown for Titania, queen of the faeries.


Spread the lavender on a blanket or sheet on a bed in an airy room.

Overhead in a pine tree a song sparrow sang lustily (and probably lustfully). I must admit that this is my favorite bird, at least tonight. Its Latin name is Melospiza melodia, meaning "melodious singer," with good reason. Each song sparrow sings the loveliest little piece of music, like an exquisite three-second symphony, complete with separate movements. First movement is always two to four broad strokes; then there’s a trill, a pretty little fillip, and a couple of chirps to round it off. The liquid sound fills your ears the way a delicious drink fills your throat.

Could Mozart write anything finer lasting three seconds? People compare it to the beginning of Beethoven’s Fifth or translate it as: “Maids maids maids put on the tea kettle – ettle – ettle!”

Here’s a link to the Cornell Lab of Ornithology Web site where you can hear a version of the song: http://www.allaboutbirds.org/guide/song_sparrow/id.

Every individual is different, but tonight’s singer was a virtuoso, and he sang at least three distinct songs within a half hour. He repeated each version about 20 times and then changed to a different melody while remaining within the clear parameters of an identifiable song sparrow song, just the way Bach might play with variations on a flute sonata.

Sitting on the steps with my daughter, breathing in the scent of lavender, hearing the cascade of birdsong, and watching the first fireflies . . . yes, this is what we’ve been waiting for through all the dark cold months, the end and beginning of our circular journey through the year.


Happy summer!


Check out Storey's Growing & Using Lavender (Bulletin A-155) for ideas on what to do with lavender.


Deb Burns, Acquiring Editor for Animal, Farming and Equestrian Topics

Thursday, June 25, 2009

Bad Gardening Weather (for Tomatoes) and What You Can Do About It

To all my vegetable gardening comrades:

I’m sitting here reviewing the first pages of The Dirt-Cheap Green Thumb, and I have just found this interesting tidbit from Rhonda Hart that could help revive our sorry-looking tomato plants.

“Tomatoes Tell All: In addition to the joys of eating them, tomato plants are useful for their diagnostic skills. They are sensitive to soil abnormalities and show distinct symptoms in response to soil deficiencies. For instance, the youngest leaves of tomatoes grown in iron-deficient soils turn yellow between the veins, with the base of the leaflets showing the most discoloration. In calcium-poor soils the youngest leaves turn purplish brown, and eventually the fruit rots at the blossom end. Purple veins indicate a phosphorus deficiency (often caused by cool growing conditions).

My tomato plants have been looking purplish since the frost we had on June 1. They are finally starting to green up (and grow), but I’m thinking some tasty bone meal might do them a world of good right now.

Yup, there’s always something new to learn here at Storey!


— Ilona Sherratt

Wednesday, June 24, 2009

Shell Chic

I was browsing Poppytalk this morning and spotted some inspiring illustrated pages of seashell crafts, scanned from a vintage French book. It brought to mind Shell Chic, full of gorgeous photography, design ideas, and instructions for creating all kinds of projects, including shell chandeliers, keepsake boxes, mirrors, birdbaths, a folding screen . . . even a shell-encrusted claw-foot bathtub, my personal favorite.

Here's a slide show of some images from the book to further fuel your inspiration!


— Melanie Jolicoeur, Associate Director of Marketing

A Little Yarn to Keep You Warm

While you're reading this, I'm in Alaska. Yes, you read that correctly. And frankly, the chilliest spring and early summer on record in the Berkshires might as well be Alaska. My family and I are taking a long-planned, long-awaited trip to the cities of Juneau, Ketchikan, and Skagway, and we'll end up in Victoria, British Columbia. Along the way we're hiking, canoeing, panning for gold (my only tourist concession), and touring the public gardens in Victoria. I'll have some lovely photos, I hope, on my return, and I'll also see if anyone in Alaska is a vegetable gardener.

The image you see at the top of this post is a wonderful book — the upcoming Itty Bitty Toys, published by Artisan Books and on sale in November. It was written by one of our family (our Workman family, that is), the inimitable Susan B. Anderson. She has a fabulous blog, which you can find here. I met Susan at The National NeedleArts Association (TNNA) trade show in January of 2007, and I've loved her ever since. We got to see some of her knitted toys here in the office a week or so ago, and grown men and women were playing like kindergartners with her irresistible projects — things like a stuffed pig; a bouncy ball with a striking felted cover; and the pièce de résistance, a knitted cat that turns inside out into a knitted mouse! There are about 30 patterns that knitters, parents, and kids will drool over. While you're at it, check out Susan's other books, Itty Bitty Hats and Itty Bitty Nursery.

As I've often said, knitters are a special breed. TNNA is a gathering place for yarn companies, designers, publishers, shop owners, and anyone associated with marketing and furthering information about needle arts. I got the scoop on new fall yarns, pattern books, trends in knits, and, of course, our authors! Edie Eckman was there, crocheting away; Judith Durant was there, beading away; Candi Jensen was there, taping for her show Knit and Crochet Today, which airs on almost one hundred PBS stations across the country; and Kristin Nicholas was there with a new line of yarn from Nashua in her signature colors—by that I mean her lush, gorgeous signature colors.

It's a treat to be able to go to TNNA, but I worked like crazy, making some new relationships, scoping out some new authors, and working with Gwen Steege, our acquiring editor for crafts, on a supersecret new project that we'll be able to let you in on . . . oh, sometime in the future.

So if you're a knitter, revel in some summery, cottonish yarn or just wear a lovely sweater. It gets chilly at night.


Amy Greeman, Storey Publicity Director

Tuesday, June 23, 2009

Judy Burris: Planting a Butterfly Garden

An adult Eastern Black Swallowtail at rest. Photo from The Life Cycles of Butterflies

The days are warm, the flowers are blooming, and butterfly season is in full swing. The most common question people ask us is "How can I get more butterflies to come to my garden?" The simple answer is plant and provide what they need. Butterflies need food and a place for their kids to grow up.

Butterflies have a four-stage life cycle: the development of an egg, a caterpillar (larva), a chrysalis (pupa), and an adult. The plants needed by butterflies are called nectar and host plants. Gardens that are filled with blooming flowers rich in nectar will attract hungry butterflies because they are on a liquid diet and their tongues are hollow tubes designed to sip nectar. Think of it this way . . . gardens full of nectar plants are like gas stations where butterflies stop to fuel up as they travel around looking for a mate or a place to lay their eggs. In order to witness the entire life cycle, gardeners must include host plants in their yards to entice the female butterflies to lay their eggs. Each species of butterfly requires specific plants. Once the eggs hatch, the caterpillars are little eating machines, but they are picky — they would rather starve to death than eat anything other than their host plants.

So far this year we have found Black Swallowtail eggs on our fennel plants, Pipevine Swallowtail eggs on our Dutchman's pipevines, Zebra Swallowtail eggs on our pawpaw trees, and Tiger Swallowtail eggs on our sweet bay magnolia, to name a few. Every year we try to attract and hand-raise at least one species of butterfly that is different from the ones we have already photographed. This year our first new one is the Mourning Cloak butterfly. We post our new life-cycle photos on our Web site at www.ButterflyNature.com.

Mourning Cloaks are not as fond of flower nectar as other butterflies. They prefer tree sap and rotting fruit. We attract them to our garden by hanging a small dish of mushy fruit from a shepherd's hook in a shady spot in our yard. We use a saucer-type hummingbird feeder minus the lid. Mourning Cloaks love old bananas and apples all squished up and mixed with some maple syrup.

Other butterflies that are attracted to this sweet 'n' sticky goop include Tawny Emperors, Hackberry Emperors, Viceroys, Red-Spotted Purples, and the occasional Monarch if you add some overly ripe watermelon to the mix. If you don't happen to have any old fruit on hand, just put an apple in the microwave for a minute or so to soften it. But wait until it has cooled completely before setting it out for the butterflies.

Kids love to experiment with different kinds of fruity goo to see what kinds of butterflies will come to the banquet. Moths are also attracted to this sweet bait, including the clearwing hummingbird moths that fly during the daytime. After dark it's fun to grab a flashlight and see what kinds of night-flying moths are visiting the fruit tray.


Brother-sister team
Wayne Richards and Judy Burris are the authors of
The Life Cycle of Butterflies and have been intrigued with butterflies since they were children. They have spent many years observing, raising, and photographing these miraculous creatures. Judy and Wayne live and study native butterflies in Kentucky
.

Sunday, June 21, 2009

Chicken Little

The chicks are growing up fast. We turned off the heat lamp this week, and they seem to be warm enough when I pop in to check on them. They're almost fully feathered, and tiny combs and wattles are coming in. I'm feeling ready for them to move outside. For the first four weeks, their box didn't smell, but now a litter pile that's a few days old is a touch on the ripe side.


Look at that tiny comb above her beak!

To be honest, I'm wringing my hands about our Rhode Island Red, Tilda. She is supposed to grow up to be the midsize chicken, larger than the Araucana and smaller than the Orpington. Right now, though, she is much smaller than either of them. I worry that she may be a runt. I don't mind if she's a little gal, really, but does anyone out there know if her size will affect her laying ability or her overall health?

Tilda is the chick in front; you can see how much smaller she is than the other two.

She's small, but she's spirited. She's the most sprightly of the three.

Also, our Araucana, Amelia, has a curved beak that doesn't shut all the way. Has anyone seen this, and is it a cause for concern? Warped beak or no, she certainly can pack in the food. She's supposed to be the smallest chicken, and she's the largest! In fact, maybe Tilda isn't a runt; maybe Amelia is a giant!

Amelia has a hook on her beak, so she can't close it all the way.

Any advice on these abnormalities would be welcome (other than culling). I think culling is sensible and appropriate for farmers or people who really need their animals to work, but our chicks are pets. They're not perfect maybe, but they're ours all the same.

Chickens are good for a laugh if nothing else.

Alethea Morrison, Storey Creative Director
All photos by Mars Vilaubi

Friday, June 19, 2009

Sue Weaver: For Love of Goats

Years ago I had the perfect job. I worked for the Minnesota Historical Society at a reconstructed early-nineteenth-century North West Company trading post rebuilt on the exact spot along the Snake River that it occupied during the winter of 1804–05. There, as a lifeways interpreter, I dressed in period clothing I’d sewn by hand and discussed and demonstrated the roles of Native and Métis women in the Great Lakes fur trade.

One day, while striding along the pine-lined path between the trading post and the outhouses, my moccasins sinking deep into riverbank sand, it occurred to me, “It doesn’t get better than this!” I was being paid a good wage to do something I loved so much that I’d gladly do it for free.

Now some twenty years later I’m at that enviable junction in life again. This time I’m writing Get Your Goat! a lighthearted guide to goat keeping for Storey. Goats are an integral part of my life. I spent the first 55 of my 62 years on earth enraptured with horses and blissfully unaware of goats. The quintessential equine obsessive, I lived and breathed horses to the exclusion of all else. Well, writing was there, too, of course — another passion cultivated since childhood.

It was late in 2004 when I was a contributing editor at Hobby Farms magazine that BowTie Press asked me to write their Hobby Farms livestock manual about goats. It sounded fun. I’d always admired goats and even owned pet wethers (castrated male goats) periodically throughout my life. Then, on a photo shoot at Claudia and Matt Gurn’s MAC Boer Goats near Winona, Missouri, I met MAC Goats' Chief Forty-Five, a.k.a. “Chiefee,” and my world shifted on its axis. Was it love at first sight, that narrowed vision, that almost imperceptible "click" I felt when he hove his huge, smelly face into mine? Whatever it was, I was smitten.

Chiefee and my husband John — that fateful first meeting

And Claudia sent me home with baby goats.

Salem and Shiloh, two of Chiefee’s orphaned three-week-old nephews, matured into 300-pound behemoths stout and strong enough to pull carts and pack camping gear upon their brawny backs. They were quickly joined by breeding-stock Boers, Nubian dairy goats, and more house-raised bottle babies than a person less besotted could imagine. Somewhere along the line my love of history and goats merged, and I began collecting vintage photographs of stalwart military mascots, period etchings of goats galore, goaty ephemera ranging from antique bock-beer labels (bock means he-goat in German) to Victorian tea trading cards, and every scrap of caprine (all things goat) folklore I could find.

A favorite vintage bock-beer label


Period engraving of the ancestor of all modern goats — the Bezoar goat


Newspaper engraving — The Prize Takers, 1875


The illustrious Sergeant Bill, Canadian mascot during WW I

The crème de la crème of my collection will be part of Get Your Goat! but the book has a serious message, too: Goats are more than commercial meat makers (under the pseudonym Maggie Sayer, I wrote about that aspect in Storey’s Guide to Raising Meat Goats) and large-scale dairy producers. They are intelligent, personable creatures brimming with mischief and joie de vivre; properly cared for, they adore their humans and make peerless farmyard friends capable of and eminently willing to provide draft power (for carting and packing), fiber (for handspinning), dairy products (yum!) and entertainment (goat agility? yes, indeed!) to the humans who love them.

And that I do.

Sue Weaver sold her first freelance article in 1969. Since then she’s marketed material to major horse periodicals, including The Western Horseman, Horse Illustrated, Chronicle of the Horse, Flying Changes, Horseman’s Market, Arabian Horse Times, The Appaloosa News, The Quarter Horse Journal, Horse’N Around, and The Brayer. Sue is based in the southern Ozark Mountains in Arkansas.

Wednesday, June 17, 2009

Time for Tea


Tea has been my beverage of choice for many years. It's a pot of freshly brewed strong black tea that coaxes me out of bed in the morning. I turn to a cup of fresh, flavorful Chinese green tea for my late-morning pick-me-up. And in the late afternoon, a small pot of subtle, grassy Japanese sencha creates a wonderful sense of well-being and focus.As the summer solstice approaches, I start filling my fridge with gallons of iced tea in anticipation of long evenings lingering on the deck, hot days working in and harvesting the garden, and Sunday afternoon picnics at a lake or park. Both black and green teas make great iced drinks. I like to keep a jug of each on hand. I've found a wonderful green tea blend from Harney & Sons called Bangkok, subtly flavored with lemongrass, coconut, and ginger, that's fabulous when lightly sweetened with honey and iced.

For a more full-bodied iced tea -- as satisfying as ice cream to my palate! — I turn to chai, the Indian spiced tea. In our book Chai: The Spice Tea of India, Diana Rosen offers more than 20 recipes for variations on the spice combinations. If you've had the premade, overly sweetened version of chai in a coffee shop, I think you'll be pleasantly surprised by how much more complex the spice flavors can be when you make it yourself — and don't overpower the spices with too much sweetener. It's also much less expensive, especially if you go to a natural foods grocery or herb shop where you can buy the spices in bulk.

Here's Diana's Favorite Chai recipe. I recommend multiplying it and brewing up a half-gallon without the milk. Keep it in the fridge, and it's ready whenever you are — just pour over ice and add milk to taste.

Makes 2 servings
1 1/2 cups water
8 green cardamom pods
6 whole black peppercorns
2 slices fresh ginger, peeled and diced
1 stick cinnamon, 2 inches long
2 whole cloves
2/3 cup whole milk
4 teaspoons sugar
3 teaspoons loose black Assam tea

1. Put the water and spices in a saucepan and bring to a boil.
2. Reduce the heat to low and let simmer for about 6 minutes.
3. Add the milk and sugar and heat to almost boiling. (NOTE: For iced tea to store, don't add the milk.)
4. Add the tea and turn off the heat. Allow the brew to infuse the tea for 3 minutes.
5. Strain the chai brew and serve.

For more ideas on creative ways to enjoy tea, see Taking Time for Tea by Diana Rosen, Tea with Friends by Elizabeth Knight, and Country Tea Parties by Maggie Stuckey.

Happy Summer!


Deborah Balmuth, Editorial Director

Get Gardening!

I'm sorry to say that this will be one of my shorter posts, as I'm about to head off to TNNA (The National NeedleArts Association) for one of their twice-yearly trade shows — but more about that in a later post.

No, what I've been thinking about lately is gardening; not ME gardening, because at home I'm known as "The Killer" for my ability to look at a plant and send it to its undeserved death. I'm thinking about our Get Gardening promotion, which is in full swing right now. Get Gardening is a cross-imprint initiative designed to get readers into gardening and gardeners into independent bookstores. To me it seems like pure genius. As a lover of both books and reading and as the daughter-in-law of an independent-bookstore owner, I feel the pain of the indie store trying to get a new audience into the store and retain the customers of previous eras who may be swayed by the not-insubstantial charms of the chain bookstores or the convenience of ordering online. I've gone that way, too. But attention must be paid to the independent stores, who persevere through credit holds, nonattendance at readings and signings, and the encroaching big-box stores all around them, sucking consumers in with come-hither sales and promotions.

Get Gardening is a masterful way to combat the summer doldrums at the bookstore by bringing in a learned voice (that is, a gardening author), and in some cases partnering with a garden center, seed store, or nursery, to bring that author's words to colorful life. Get Gardening started in Portland, Oregon, with our sister publisher, Timber Press. Powell's Bookstore, the master of Oregon booksellers, hosted events with gardening authors last year, and Timber created some lovely artwork to use in their posters and promotional marketing pieces. This year, Storey, Timber, Workman, and Algonquin have partnered to bring this great idea to stores from California (Chaucer's Books in Santa Barbara) to Vermont (Northshire Bookstore in Manchester Center) and everywhere in between (BookPeople in Austin, Texas). The range of talent involved is simply amazing . . . from Amy Stewart, author of Wicked Plants and Flower Confidential from Algonquin, to Scott Calhoun, author of Storey's Designer Plant Combinations, to Timber Press's Debra Lee Baldwin, author of Designing with Succulents — very popular in those arid Texas plains!

I feel strongly that the success of this initiative is directly tied into the continuing popularity of the independent bookstore. Even though some are struggling to pay the bills every month, the owners and event coordinators are still looking for ingenious ways to create buzz, move books, and enlighten the readers who frequent their businesses. We all owe it to ourselves to make at least one trip a month (or more!) to an independent bookstore in our area, strike up a conversation with a bookseller, and bring home a book. Buy a book that gets you thinking about designing a garden with continuously blooming flowers, even if you don't plant any. Buy a book that describes the plants that can kill you, for the vicarious thrill of it. Buy a book that shows you how a cactus can thrive on once-a-month watering. Just buy a book.

You can find the entire Get Gardening schedule here: http://www.storey.com/garden.schedule.php.

— Amy Greeman, Storey Publicity Director

Tuesday, June 16, 2009

Randy Mosher: A Toast to Dad on Father's Day


Ahhh, memories. Sultry August days at the ball park, just me 'n dad, watching the Indians from the bleachers as I snuck a taste of his Blatz, cool and exotic to my young taste buds.

Those are great memories, but they must be somebody else’s. I hate sports, there were three of us kids, and dad’s not any kind of a beer drinker. My childhood summer reveries consisted of scraping the lead paint off our aging house and coping with the soul-searing itchiness of the fiberglass insulation we were stuffing into all the nooks and crannies.

Up on the ladders, it was just dad and me, my younger brother being unsuitable for the task for a variety of reasons. Day after day we quietly pounded away at the task, trying to make the best of it, enjoying the kind of tough-guy camaraderie that people in challenging circumstances always share. That summer, I learned things about stamina and determination, qualities I would need when a sewer pipe collapsed six feet under the rock-hard frozen turf during the following Christmas break. And although I couldn’t understand it at the time, it is to my father’s great credit that he was willing to generously share these opportunities for extreme personal growth with me.

So how did I get to beer? Random encounters at first, like everybody. Then, a willingness to rip things apart and see how they worked took hold in this area as it had so many times before, and I found myself on the trail of a pretty exciting subject. Brewing followed, then a book, and another, and another. Beer is a complex topic, and to really get to know it inside out you need some study of botany, prehistory, biochemistry, art, metallurgy, and linguistics. All of which I’ve been able to pursue because, well, I didn’t know I couldn’t.

Randy Mosher's first book by Storey Publishing, Tasting Beer ©2009

For dad, nothing is too challenging. He single-handedly re-roofed his house at 74, and he did two road trips to the Gulf Coast to work on Habitat for Humanity projects this winter. He’s 86 now. As a child of the depression, he knew plenty of hardship. He caught a break when the Army taught him to fly in the war, and he was struck by the notion that he could be more than a chicken farmer, eventually becoming an architect.

I’m not the house-crunching animal he is, but I have my own set of skills. And I like to think a little of his calm confidence and fearlessness in approaching any task, no matter how formidable, rubbed off on my young self. For a man of action like my father, deeds mean far more than words, but still, it never hurts to say it. Thanks, Dad, and happy Father’s Day.

Randy Mosher is well-known in the beer world for his illustrations and his beer label designs. His work is frequently seen in Zymurgy. Randy is a public speaker, teacher, writer, and enthusiastic promoter of traditional beer styles. He is the author of Tasting Beer, The Brewer's Companion and Radical Brewing, as well as many articles and columns for All About Beer, the country's leading beer magazine. Randy lives in Chicago, Illinois.

Monday, June 15, 2009

Garden Blogger's Bloom Day — June 2009

It's June 15th and the hills are alive! Time for Storey employees to share the floral bounty with a Bloom Day post for May Dreams Garden.


Blueberry blossoms, globe allium, and blue skies from Maryellen Mahoney.

Lupines, oriental poppies, and a touch of iris from the hills of Ashfield. Photo by Dan Reynolds.


White and purple clematis, and white bellflowers. Photos by Anne Guest.


Roses, honeysuckle, and a pink peony from the garden of Lisa Hiley.


Painted daisies and (rain soaked) peonies in my own garden. Happy gardening!

— Melanie Jolicoeur, Associate Director of Marketing

LinkWithin